The demand for user-centric application software development is higher than ever, with the market poised to reach US$179.90 billion in 2024. While this demand presents a myriad of opportunities for businesses, meeting it traditionally is a time-consuming process requiring extensive coding and iterations. However, with advancements like generative AI, many tools like ChatGPT are transforming this scenario by automating significant portions of the development process.
.
While the benefits are substantial, AI-generated code is still under scrutiny. This is why we have experimented with ChatGPT to build an iOS-based mobile application. Let’s dig deeper to explore its capabilities and limitations in iOS app development.
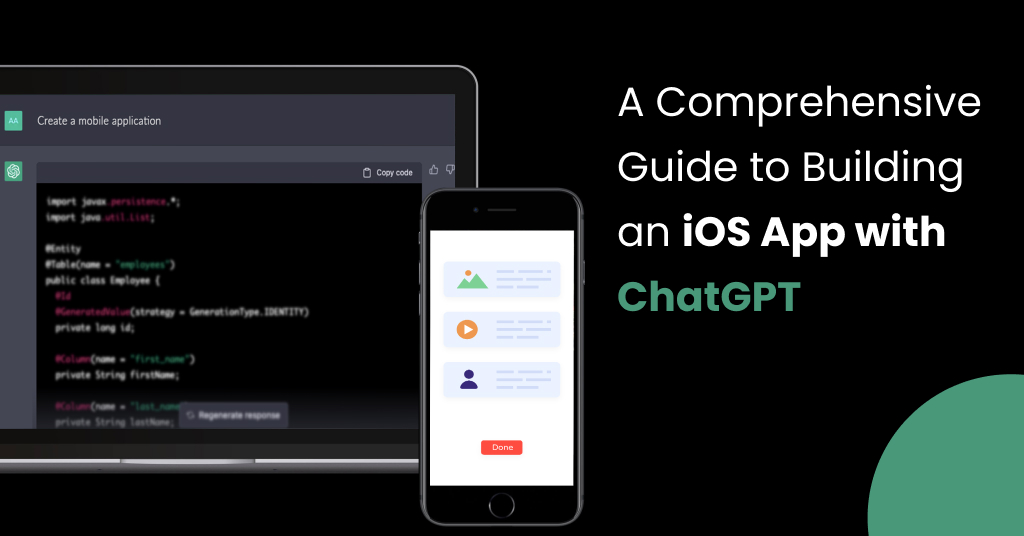
Step-by-Step Guide to Develop an iOS Application with ChatGPT
When you begin working on an iOS app, generative AI tools like OpenAI’s ChatGPT can provide invaluable support, whether you already have an idea or are still searching for one. We had an idea and experimented with ChatGPT using the following steps.
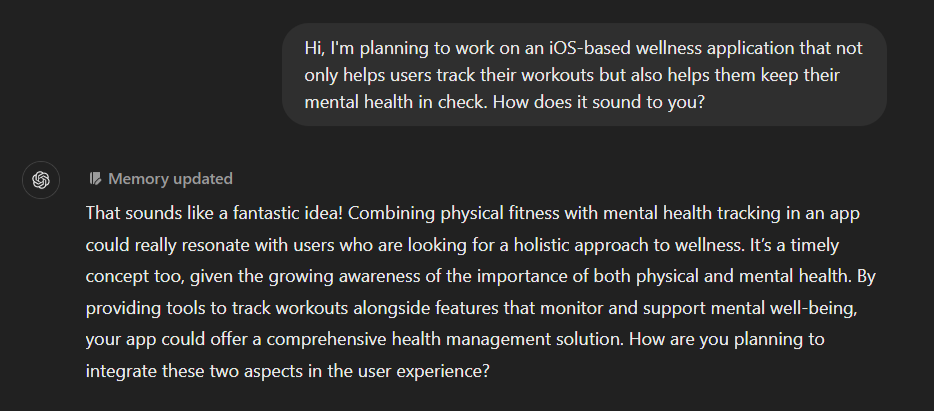
Step #1: App Ideation
We wanted to build a wellness app to help users track workouts and improve their mental health. To help ChatGPT grasp this idea, we initiated simulated conversations for feedback and suggestions.
Even if you do not have an app idea, leverage GPT’s ideation capabilities to the best of your ability. You can ask it to suggest some trending, user-centric application ideas for targeted consumers. Here’s how.
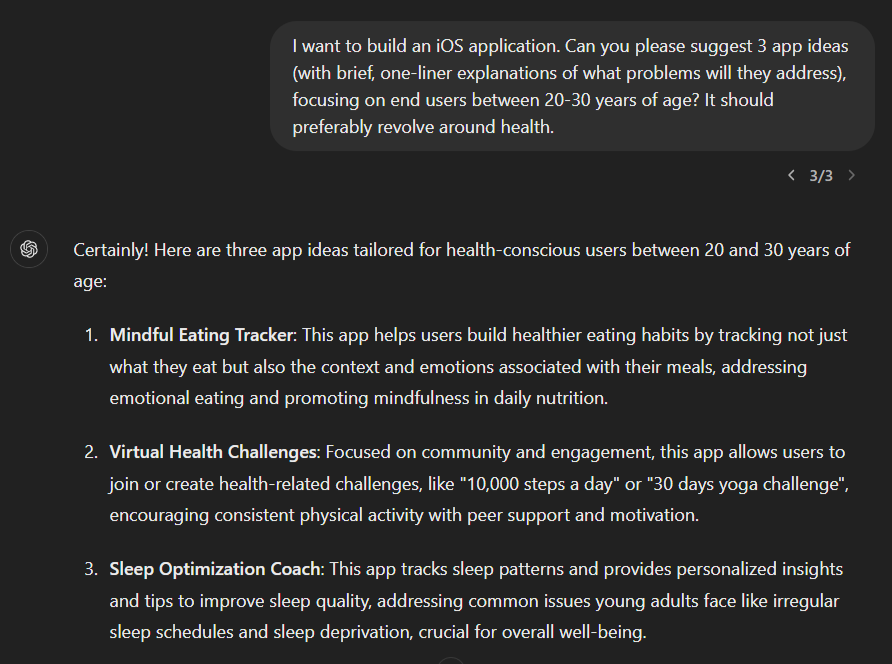
In either case, such interactions can help you reach a starting point in your iOS app development journey. It will help you develop a clear, more market-aligned vision of your app.
Let’s move on with the wellness app. We asked ChatGPT to recommend a good structure for this application.
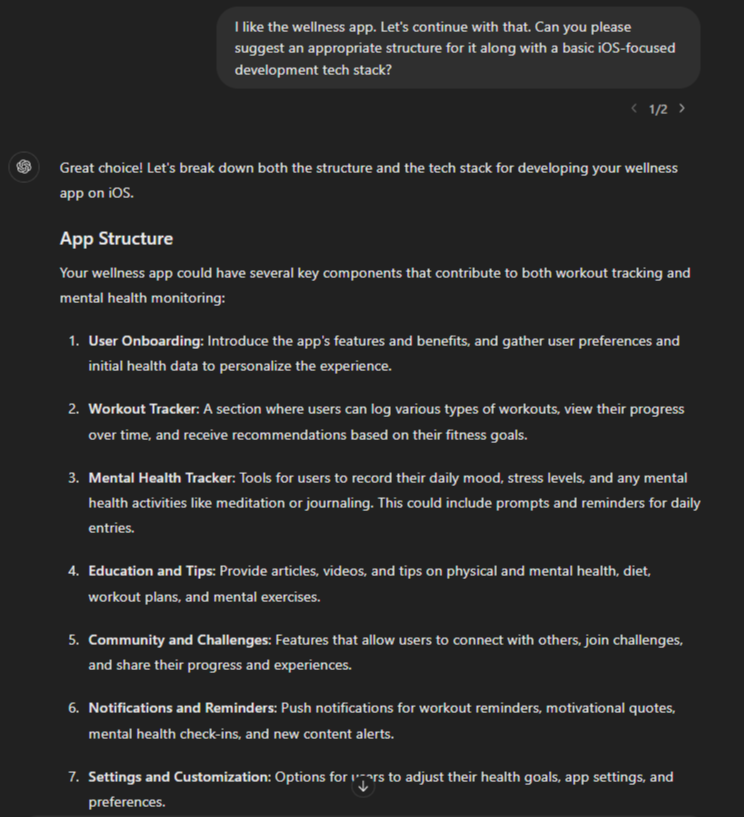
Note: These are only recommendations and you can always select your desired components. Based on that, you can ask ChatGPT to discard other functionalities and start the development process accordingly.
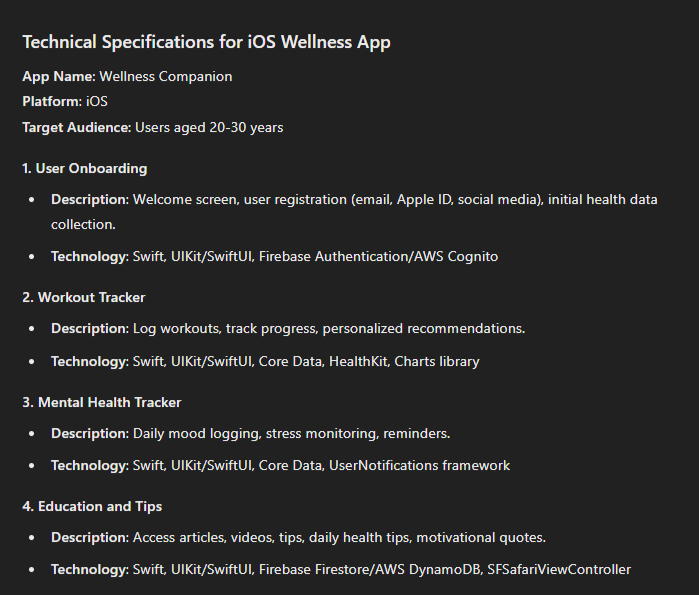
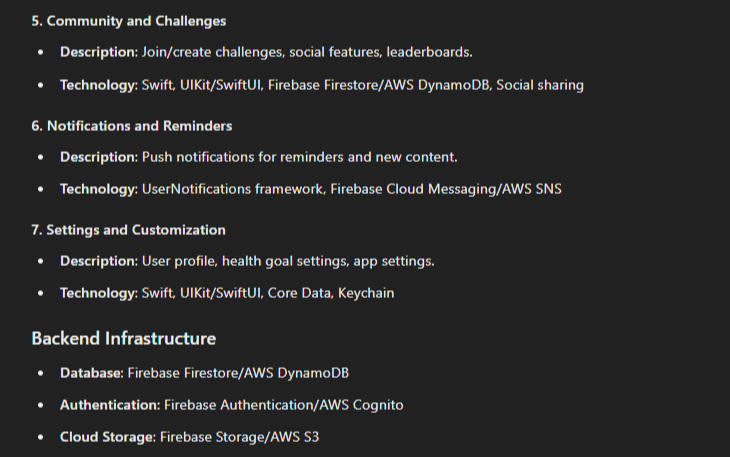
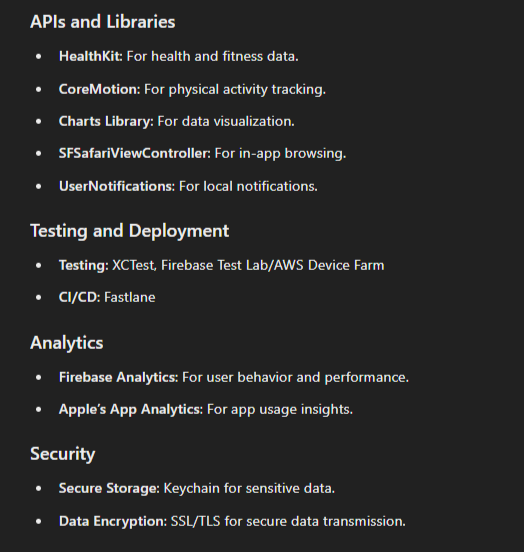
Step #2: Creating App Technical Specifications with ChatGPT
To conceptualize your iOS application idea, you need to have some technical specifications, giving you an insight into how the application will turn out to be. Unsurprisingly, ChatGPT can help you with this too.
We simply asked it to draw up the technical specifications for the iOS-based wellness mobile app.
Step #3: Generating Code for this Mobile Application
To start developing the app based on the provided technical specs, we asked the following:
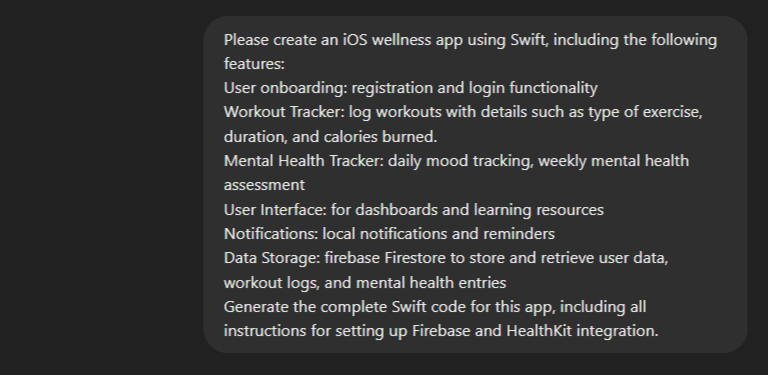
The result generated by ChatGPT for the above prompt has been added below chronologically. You can follow the same to build your iOS app.
Setting up the Project in Xcode
- Create a new Xcode project: Open Xcode and create a new project. Choose “App” under the iOS tab.
- Install CocoaPods: Open Terminal and navigate to your project directory. Run sudo gem install cocoapods.
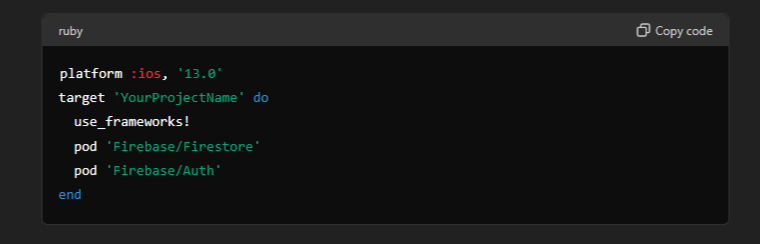
- Initialize CocoaPods: Run pod init and add the following to your Podfile:
- Open the .xcworkspace: Close the current Xcode project and open the .xcworkspace file instead.
Setting up Firebase
Add Firebase to your project:
- Go to the Firebase Console, create a new project, and follow the instructions to add an iOS app.
- Download the GoogleService-Info.plist file and add it to your Xcode project.
- Configure Firebase in your AppDelegate.swift:
import UIKit
import Firebase
@UIApplicationMain
class AppDelegate: UIResponder, UIApplicationDelegate {

	var window: UIWindow?

	func application(_ application: UIApplication,
		didFinishLaunchingWithOptions launchOptions: [UIApplication.LaunchOptionsKey: Any]?) -> Bool {
	  FirebaseApp.configure()
	  return true
	}
}
Set up Healthkit
Add HealthKit capability: In Xcode, navigate to your project settings, select your target, and go to the “Signing & Capabilities” tab. Click the “+” button and add “HealthKit”.
Request HealthKit permissions in your ViewController.swift:
import HealthKit
class ViewController: UIViewController {
	let healthStore = HKHealthStore()

	override func viewDidLoad() {
	  super.viewDidLoad()
	  requestHealthKitAuthorization()
	}

	func requestHealthKitAuthorization() {
	let healthKitTypes: Set = [
	  HKObjectType.quantityType(forIdentifier: .activeEnergyBurned)!
	]

	healthStore.requestAuthorization(toShare: healthKitTypes, read: healthKitTypes) { (success, error) in
		if !success {
		print("HealthKit Authorization Failed")
			}
		}
	}
}
User Onboarding
Start by creating a User Model:
import Foundation
import FirebaseFirestoreSwiftstruct User: Codable, Identifiable {
	@DocumentID var id: String?
	var email: String
}
To add Registration and Login functionality:
import SwiftUI
import Firebase
struct ContentView: View {
	@State private var email = ""
	@State private var password = ""
	@State private var isLoggedIn = false

	var body: some View {
		VStack {
			if isLoggedIn {
				Text("Welcome!")
			} else {
				TextField("Email", text: $email)
					.textFieldStyle(RoundedBorderTextFieldStyle())
					.padding()
				SecureField("Password", text: $password)
					.textFieldStyle(RoundedBorderTextFieldStyle())
					.padding()
				Button(action: register) {
					Text("Register")
				}.padding()
				Button(action: login) {
					Text("Login")
				}.padding()
			}
		}
	}

	func register() {
		Auth.auth().createUser(withEmail: email, password: password) { authResult, error in
			if let error = error {
				print("Registration failed: \(error.localizedDescription)")
			} else {
				isLoggedIn = true
			}
		}
	}

	func login() {
		Auth.auth().signIn(withEmail: email, password: password) { authResult, error in
			if let error = error {
				print("Login failed: \(error.localizedDescription)")
			} else {
				isLoggedIn = true
			}
		}
	}
}
Workout Tracker
Start with the logging model:
import Foundation
import FirebaseFire
storeSwiftstruct Workout: Codable, Identifiable {
	@DocumentID var id: String?
	var type String
	var duration: Double
	var caloriesBurned: Double
	var userId: String
}
To create the logging view:
import SwiftUI
import Firebase
struct WorkoutView: View {
	@State private var type = ""
	@State private var duration = ""
	@State private var caloriesBurned = ""
	@State private var userId = Auth.auth().currentUser?.uid ?? ""

	var body: some View {
		VStack {
			TextField("Type of Exercise", text: $type)
				.textFieldStyle(RoundedBorderTextFieldStyle())
				.padding()
			TextField("Duration (minutes)", text: $duration)
				.textFieldStyle(RoundedBorderTextFieldStyle())
				.padding()
			TextField("Calories Burned", text: $caloriesBurned)
				.textFieldStyle(RoundedBorderTextFieldStyle())
				.padding()
			Button(action: logWorkout) {
				Text("Log Workout")
			}.padding()
		}
	}
	func logWorkout() {
		let db = Firestore.firestore()
		let workout = Workout(type: type, duration: Double(duration) ?? 0, caloriesBurned: Double(caloriesBurned) ?? 0, userId: userId)
		do {
			try db.collection("workouts").addDocument(from: workout)
		} catch {
			print("Error adding workout: \(error)")
		}
	}
}
Mental Health Tracker
Start with the entry model:
import Foundation
import FirebaseFirestoreSwift
struct MentalHealthEntry: Codable, Identifiable {
	@DocumentID var id: String?
	var mood: String
	var date: Date
	var userId: String
}
To create the tracking view:
import SwiftUI
import Firebase
struct MentalHealthView: View {
	@State private var mood = ""
	@State private var userId = Auth.auth().currentUser?.uid ?? ""

	var body: some View {
		VStack {
			TextField("How are you feeling today?", text: $mood)
				.textFieldStyle(RoundedBorderTextFieldStyle())
				.padding()
			Button(action: logMood) {
				Text("Log Mood")
			}.padding()
		}
	}

	func logMood() {
		let db = Firestore.firestore()
		let mentalHealthEntry = MentalHealthEntry(mood: mood, date: Date(), userId: userId)
		do {
			try db.collection("mentalHealthEntries").addDocument(from: mentalHealthEntry)
		} catch {
			print("Error adding mental health entry: \(error)")
		}
	}
}
User Interface
Dashboard creation:
import SwiftUI
struct DashboardView: View {
	var body: some View {
		TabView {
			WorkoutView()
				.tabItem {
				Label("Workouts", systemImage: "figure.walk")
				}
			MentalHealthView()
				.tabItem {
				Label("Mental Health", systemImage: "heart")
				}
			LearningResourcesView()
				.tabItem {
				Label("Learn", systemImage: "book")
				}
			}
		}
	}

struct LearningResourcesView: View {
	var body: some View {
		Text("Learning Resources")
	}
}
Notifications
Setting up local notifications:
import UserNotifications
class NotificationManager {
	static let shared = NotificationManager()

	func requestAuthorization() {
		UNUserNotificationCenter.current().requestAuthorization(options: [.alert, .sound, .badge]) { granted, error in
			if let error = error {
				print("Notification authorization error: \(error)")
			}
		}
	}

	func scheduleNotification(title: String, body: String, timeInterval: TimeInterval) {
		let content = UNMutableNotificationContent()
		content.title = title
		content.body = body

		let trigger = UNTimeIntervalNotificationTrigger(timeInterval: timeInterval, repeats: false)
		let request = UNNotificationRequest(identifier: UUID().uuidString, content: content, trigger: trigger)

		UNUserNotificationCenter.current().add(request)
	}
}
Data Storage
Firestore configuration:
import FirebaseFirestore
import FirebaseFirestoreSwift
class FirestoreManager {
	static let shared = FirestoreManager()
	let db = Firestore.firestore()

	func save<T Encodable>(_ value: T, to collection: String) throws {
		_ = try db.collection(collection).addDocument(from: value)
	}

	func fetch<T: Decodable>(_ type: T.Type, from collection: String, completion: @
Step #4: Testing the Code
After setting up your project with the necessary configurations and code, the next step is to test the code. Testing is a critical part of the development process. It ensures your app functions correctly and provides a smooth user experience. As we have built the application in Xcode, we’ll use its default unit testing framework, XCTest. Here’s how you can test the different components of your iOS wellness app.
Unit Testing with XCTest
Unit tests validate the functionality of inpreidual components of your app.
Setting up Unit Tests:
- Add a new Unit Test target in Xcode if not already created: Go to File > New > Target and select iOS Unit Testing Bundle.
- Create test cases in the YourProjectNameTests folder.
Example Test Case:
import XCTest
@testable import YourProjectName
class YourProjectNameTests: XCTestCase {

		func testUserRegistration() {
		// Arrange
		let authManager = AuthManager()
		let email = "test@example.com"
		let password = "password123"

		// Act & Assert
		let expectation = self.expectation(description: "User registration should succeed")
		authManager.register(email: email, password: password) { success in
			XCTAssertTrue(success)
			expectation.fulfill()
		}
		waitForExpectations(timeout: 5, handler: nil)
	}

	func testWorkoutLogging() {
	// Arrange
		let workoutManager = WorkoutManager()
		let workout = Workout(type: "Running", duration: 30, caloriesBurned: 300, userId: "testUserId")

		// Act & Assert
		let expectation = self.expectation(description: "Workout logging should succeed")
		workoutManager.logWorkout(workout) { success in
			XCTAssertTrue(success)
			expectation.fulfill()
		}
		waitForExpectations(timeout: 5, handler: nil)
	}
}
UI Testing with XCTest
UI tests validate the user interface and user interactions.
Setting up UI Tests:
- Add a new UI Test target in Xcode: Go to File > New > Target and select iOS UI Testing Bundle.
- Create UI test cases in the YourProjectNameUITests folder.
Example UI Test Case:
import XCTest
class YourProjectNameUITests: XCTestCase {

	func testLoginUI() {
		let app = XCUIApplication()
		app.launch()

		// Ensure the email and password fields exist
		let emailField = app.textFields["Email"]
		XCTAssertTrue(emailField.exists)

		let passwordField = app.secureTextFields["Password"]
		XCTAssertTrue(passwordField.exists)

		// Simulate user input and login button tap
		emailField.tap()
		emailField.typeText("test@example.com")

		passwordField.tap()
		passwordField.typeText("password123")

		app.buttons["Login"].tap()

		// Verify that the user is logged in
		let welcomeText = app.staticTexts["Welcome!"]
		XCTAssertTrue(welcomeText.exists)
	}
}
To be 100% sure of this AI-generated code’s quality, you can also test it manually. Here is a manual testing checklist to follow:
- To test the User Registration functionality:
- Test with valid and invalid email/password combinations.
- Verify email format validation and password strength requirements.
- To test the Login functionality:
- Test with correct and incorrect login credentials.
- Verify error messages for invalid login attempts.
- To test Workout Logging:
- Test logging different types of workouts.
- Verify the accuracy of saved workout details.
- To test the Mental Health Tracking functionality:
- Test daily and weekly entries.
- Verify the accuracy and display of saved entries.
- To test UI Navigation:
- Ensure smooth navigation and responsive design.
- Test on different screen sizes and orientations.
- To test Notifications:
- Schedule, receive, and interact with notifications.
- Customize and verify notification preferences.
- To test Data Storage
- Ensure all data is stored and retrieved correctly from Firestore.
- Verify data integrity and consistency.

Limitations of ChatGPT-Based iOS Application Development
While ChatGPT accelerates the iOS application development process, it also poses a few limitations.
- Lacking Human Intuition and Creativity
ChatGPT may have a structured approach to iOS app development and excel at providing code within a few seconds; however, it lacks the human creativity and intuition required to create user-centric applications that address their pain points.
- Limited Contextual Understanding
Like other generative AI tools, ChatGPT struggles to understand the broader context of an app’s purpose and user needs. This often results in generic, less coherent solutions.
- Incomplete Code Generation
Even though ChatGPT generates accurate-looking code snippets, it may not produce complete, production-ready code. This is why developers still need to review, test, and refine the AI-generated code manually, ensuring it meets quality standards.
- Dependency on Training Data
The code generated by ChatGPT is influenced by the data on which it has been trained. This training data might be outdated with existing technologies, frameworks, and tools used in iOS app development.
To ensure your iOS app remains competitive, it’s crucial to stay informed about the latest app development trends.
- Limited Support for Testing and Debugging
ChatGPT is very good at suggesting testing strategies but it still lacks the capability to run and debug code in real-time. This necessitates manual intervention to ensure the code addresses all functionalities and meets user requirements.
The Takeaway
Generative AI tools like ChatGPT have become invaluable in assisting software and application development by generating significant portions of code. However, they still have notable limitations that require human oversight and intervention. Despite such limitations, the future of generative AI in code generation seems to be promising, especially as these technologies continue to evolve with each day. They are likely to become more sophisticated and capable of understanding the broader context. When this happens, you can expect even shorter development cycles, reduced costs, and more innovative applications.